Skip to content

SHOP LOCAL

SHOP ONLINE

    Search
    Please assign a menu to the primary menu location under Menus.
    Search
    START TYPING AND PRESS ENTER TO SEARCH
    • SHOP
      • PAINT
        • Shop All Paint
        • Alchemy Limestone & Chalk
        • Mineral Paint
        • Wall Paint
        • Metallic Paint
        • Milk Paint
        • Smooth Paint Water Mister
        • Colour Card & Fan Decks
      • Paint Kits
        • Alchemy Starter Kit
        • Paint Kit Bundle
        • Kitchen Cabinet Refinishing Kit for Light Colours
        • Kitchen Cabinet Refinishing Kit for colours
        • Jennylyn’s Essential Paint Tool Kit
        • Milk Paint Value Kit – Tester Bundle
        • Milk Paint Value Kit – Large Bag Bundle
        • Milk Paint Starter Kit
        • Metallic Tester Gift Set
      • Other Kits
        • Prep Kit
        • Finishing Kit Sampler Pack
        • Staalmeester – Essential Brush Set
        • Staalmeester® ProHybrid Series Gift Box
        • Staalmeester Rollers Set #1
        • Staalmeester Rollers Set #2
        • Staalmeester Rollers Set #3
        • Self-Care Kit for Painters
      • ACCESSORIES
        • All Accessories
        • Brushes
        • Rollers
        • Brush Soap
        • Paint Extender
        • Applicator Pads
        • Sanding Sponges & Pads
        • Tough Coat Applicator Sponge
        • Beeswax Distressing Block
        • Paint Trays
        • Whisk
      • ACCENTS
        • All Accents
        • Glaze
        • Crackled Texture
        • Decoupage & Transfer Gel
        • Fresco Texturizing Powder
        • Smooth Embossing Paste
        • Pouring Resin
        • Cell Enhancer
      • FINISH
        • All Finishes
        • Tough Coat
        • Stain & Finishing Oil
        • Furniture Waxes
        • Beeswax Finish
        • Hemp Oil
        • Gel Stain & Top Coat
        • Tung Oil
        • Salad Bowl Finish
      • PREP
        • ALL PREP
        • TSP Alternative
        • Odourless Solvent
        • Ultra Grip
        • Transition
      • SWAG
        • All Swag
        • Bracelets
        • T-Shirts
        • Aprons
        • Self-Care
        • Travel Mugs
        • Social Media Guide
    • Colours
      • All Paint
      • Alchemy Limestone & Chalk
      • MINERAL PAINT
      • WALL PAINT
      • METALLIC PAINT
      • MILK PAINT KITS
      • SMOOTH PAINT WATER MISTER
      • COLOUR CARD & FAN DECKS
    • Inspiration
    • Learn
      • Prep
      • Apply
      • Top Coats
      • Choose A Brush
      • Techniques + Tips
    • About
      • Meet the Creator
      • Become a Retailer
      • Become an Affiliate
    logo 1
    • Shop

      Paint

      • All Paint
      • ALCHEMY LIMESTONE & CHALK
      • MINERAL PAINT
      • METALLIC PAINT
      • MILK PAINT
      • SMOOTH PAINT WATER MISTER
      • COLOUR CARD & FAN DECKS
      • All Paint
      • ALCHEMY LIMESTONE & CHALK
      • MINERAL PAINT
      • METALLIC PAINT
      • MILK PAINT
      • SMOOTH PAINT WATER MISTER
      • COLOUR CARD & FAN DECKS

      Paint Kits

      • All Kits
      • Alchemy Starter Kit
      • Paint Kit Bundle
      • Kitchen Cabinet Refinishing Kits
      • Milk Paint Kits
      • Gifts
      • All Kits
      • Alchemy Starter Kit
      • Paint Kit Bundle
      • Kitchen Cabinet Refinishing Kits
      • Milk Paint Kits
      • Gifts

      ACCESSORIES

      • ALL ACCESSORIES
      • BRUSHES
      • ROLLERS
      • SCRAPERS
      • BRUSH SOAP
      • PAINT EXTENDER
      • APPLICATOR PADS
      • SANDING SPONGES & PADS
      • TOUGH COAT APPLICATOR SPONGE
      • BEESWAX DISTRESSING BLOCK
      • PAINT TRAYS
      • WHISK
      • ALL ACCESSORIES
      • BRUSHES
      • ROLLERS
      • SCRAPERS
      • BRUSH SOAP
      • PAINT EXTENDER
      • APPLICATOR PADS
      • SANDING SPONGES & PADS
      • TOUGH COAT APPLICATOR SPONGE
      • BEESWAX DISTRESSING BLOCK
      • PAINT TRAYS
      • WHISK

      Other Kits

      • All Kits
      • Brush & Roller Kits
      • Prep Kit
      • Finishing Kit Sampler
      • Self-Care Kit for Painters
      • All Kits
      • Brush & Roller Kits
      • Prep Kit
      • Finishing Kit Sampler
      • Self-Care Kit for Painters

      ACCENTS

      • ALL ACCENTS
      • GLAZE
      • CRACKLED TEXTURE
      • DECOUPAGE & TRANSFER GEL
      • FRESCO TEXTURIZING POWDER
      • SMOOTH EMBOSSING PASTE
      • POURING RESIN
      • CELL ENHANCER
      • ALL ACCENTS
      • GLAZE
      • CRACKLED TEXTURE
      • DECOUPAGE & TRANSFER GEL
      • FRESCO TEXTURIZING POWDER
      • SMOOTH EMBOSSING PASTE
      • POURING RESIN
      • CELL ENHANCER

      FINISH

      • ALL FINISHES
      • ULTRA GUARD
      • TOUGH COAT
      • STAIN & FINISHING OIL
      • FURNITURE WAXES
      • BEESWAX FINISH
      • HEMP OIL
      • GEL STAIN & TOP COAT
      • TUNG OIL
      • ALL FINISHES
      • ULTRA GUARD
      • TOUGH COAT
      • STAIN & FINISHING OIL
      • FURNITURE WAXES
      • BEESWAX FINISH
      • HEMP OIL
      • GEL STAIN & TOP COAT
      • TUNG OIL

      Prep

      • ALL PREP
      • TSP ALTERNATIVE
      • ODOURLESS SOLVENT
      • ULTRA GRIP
      • TRANSITION
      • ALL PREP
      • TSP ALTERNATIVE
      • ODOURLESS SOLVENT
      • ULTRA GRIP
      • TRANSITION

      SWAG

      • ALL SWAG
      • GIFT CARD
      • APRONS
      • SELF-CARE
      • ALL SWAG
      • GIFT CARD
      • APRONS
      • SELF-CARE

      Get inspired by inspirational projects.

    • Colours
      • All Paint
      • ALCHEMY LIMESTONE & CHALK
      • MINERAL PAINT
      • METALLIC PAINT
      • MILK PAINT
      • SMOOTH PAINT WATER MISTER
      • COLOUR CARD & FAN DECKS
      • All Paint
      • ALCHEMY LIMESTONE & CHALK
      • MINERAL PAINT
      • METALLIC PAINT
      • MILK PAINT
      • SMOOTH PAINT WATER MISTER
      • COLOUR CARD & FAN DECKS
    • Inspiration
    • Learn
      • Prep
      • Apply
      • Top Coats
      • Choose A Brush
      • Techniques + Tips
      • Milk Paint How-To
      • Limewash Walls
      • Prep
      • Apply
      • Top Coats
      • Choose A Brush
      • Techniques + Tips
      • Milk Paint How-To
      • Limewash Walls
    • About
      • Meet the Creator
      • Become a Retailer
      • Become an Affiliate
      • Meet the Creator
      • Become a Retailer
      • Become an Affiliate

    COLOURS PROJECT TECHNIQUE

    DIY Ombre Beaded Chandelier

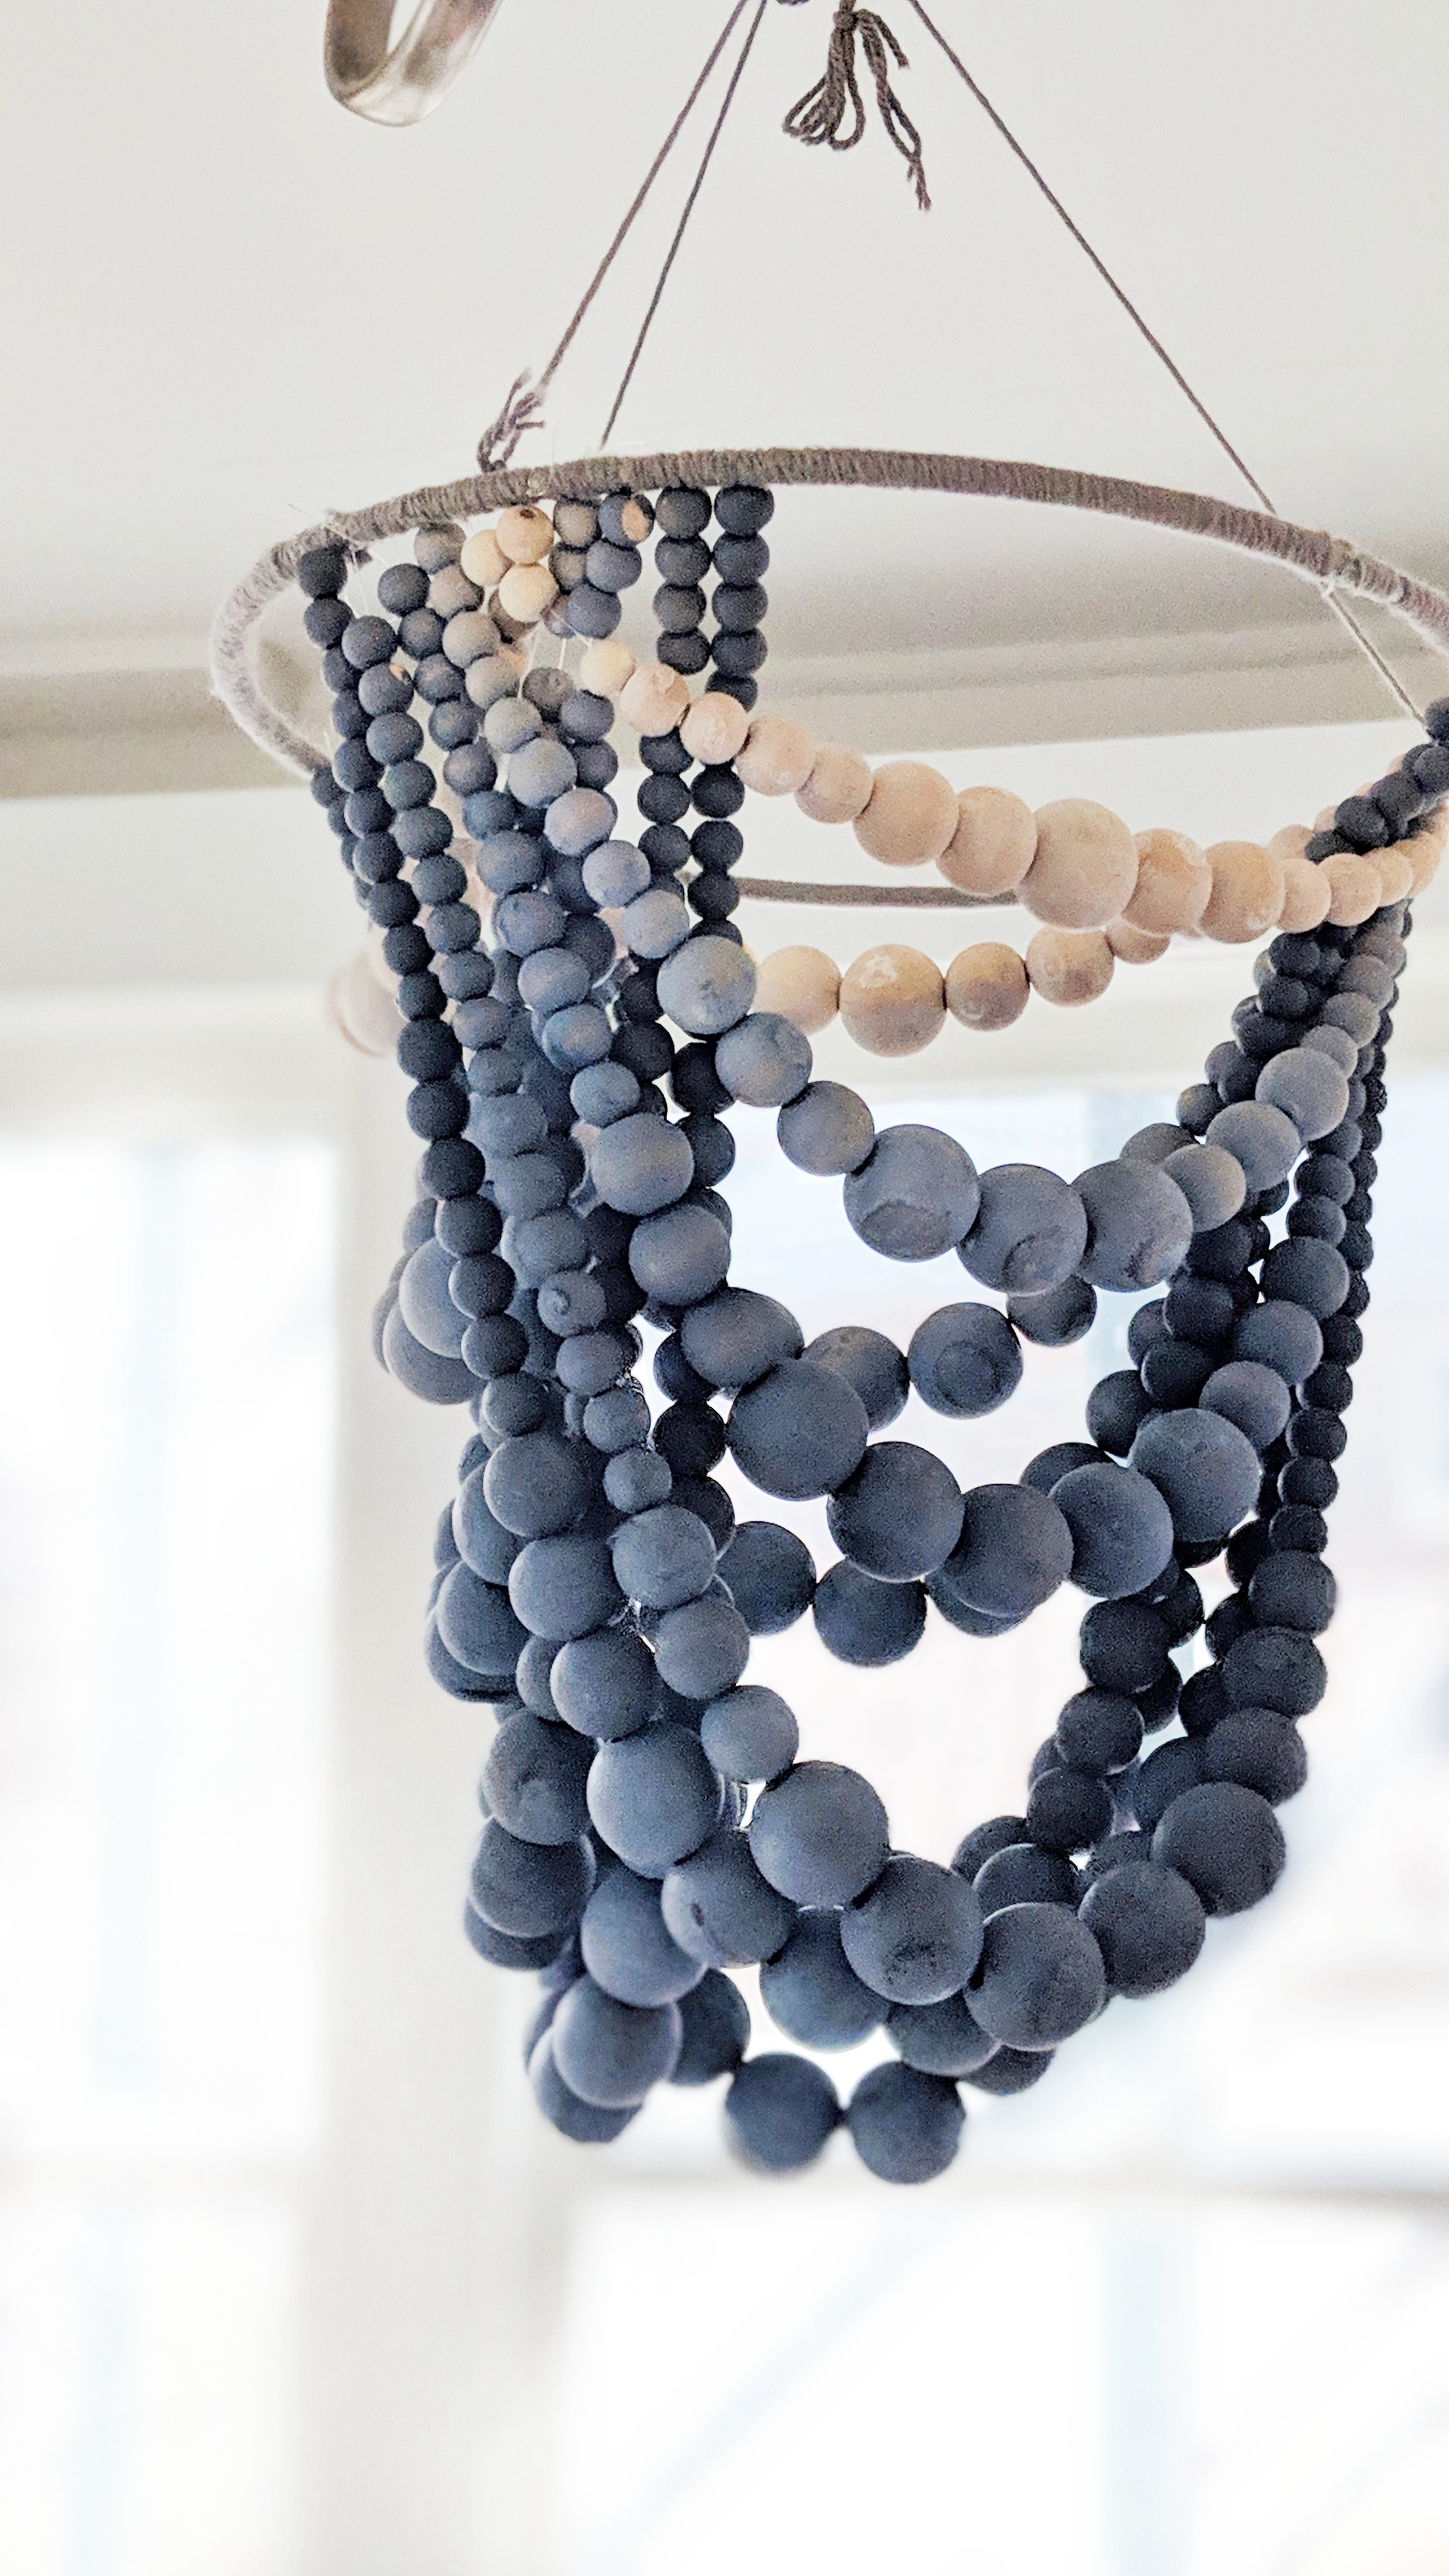
    We know chandeliers can cost a LOT of money. So we decided to create one of our own that looks like a million bucks without the price tag and show you how you can make your own. While we choose shades of blue and grey for ours, you can personalize it with any Fusion Mineral Paint of your choice and we have lots of wonderful colors for you to choose from! This DIY Ombre Beaded Chandelier tutorial is going to teach you how to make this colorful piece yourself.

    We were inspired by this beautiful DIY bead chandelier that The House That Lars Built shared previously but we wanted to add a little #PaintItBeautiful love.

    So let’s get started with our DIY Ombre Beaded Chandelier tutorial!

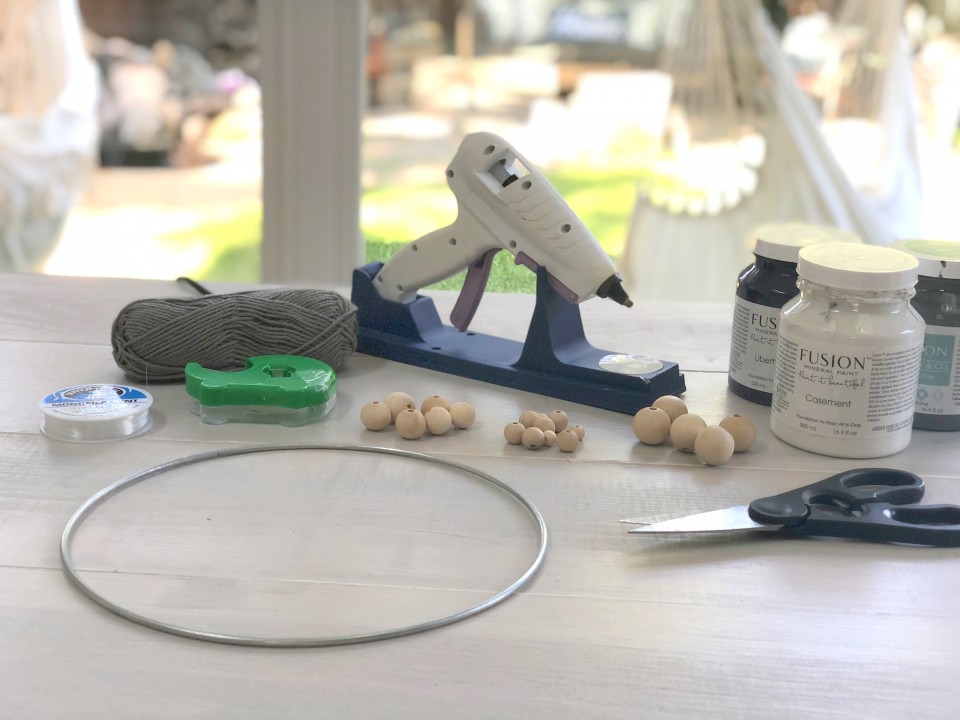
    Materials used to make our DIY Ombre Beaded Chandelier:

    • Fusion Mineral Paint in Liberty Blue, Soap Stone and Casement
    • Metal hoop
    • Glue gun
    • Yarn
    • Wooden Beads in different sizes (approximately 5 – 10 of each size)
    • Clear string or fishing line

    STEP 1 – PREPARE THE BASE HOOP

    The first thing you’re going to do is wrap your yarn around the metal hoop. Every so often as the yarn strand ends, just use a dab of glue from your glue gun to secure the yarn to the hoop until it is fully covered.

    STEP 2 – PREPARE YARN

    Using your string (this is where you will thread your beads onto) measure out about 4x the diameter of your hoop.

    STEP 3 – HOW TO BEAD THE BEADS 

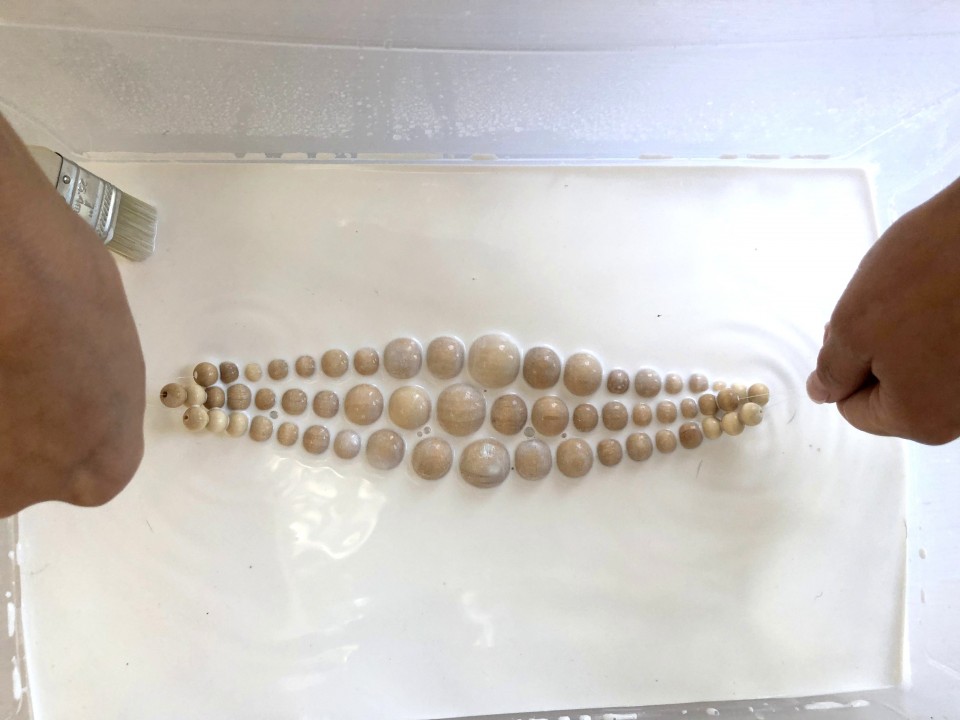
    The pattern we did for the longest strands of beads, if you imagine a horizontal thread laying in front of you from left to right, was:

    • 10 smallest beads – 7 smaller beads – 3 medium beads – 7 large beads – 3 medium beads – 7 smaller beads – 10 smallest beads

    The most important thing is to ensure you that your largest beads are in the middle and to have the same amount of beads on each sides of the largest beads, so when it hangs, both sides of the beaded string are symmetrical.

    Your bead amounts may vary depending on the length you want per strand and also the size of your hoop that you are using. But the best way to determine how long you want your bead string to be is to hold it up by eye and then remove or add beads as necessary.

    DIY BEAD CHANDELIER TIP:

    After you make two or three equal length strands of beads, tie the ends together in a knot (that you will later untie) to make sure they do not fall apart on you! We don’t want that to happen. This will leave you with “one” double (or triple) bead strand to use as you dye the beads and save you time as well.

    You don’t have to do this step if you’re comfortable enough using individual strands. We just wanted to make sure the beads didn’t fall off of our threads accidentally during the painting process.

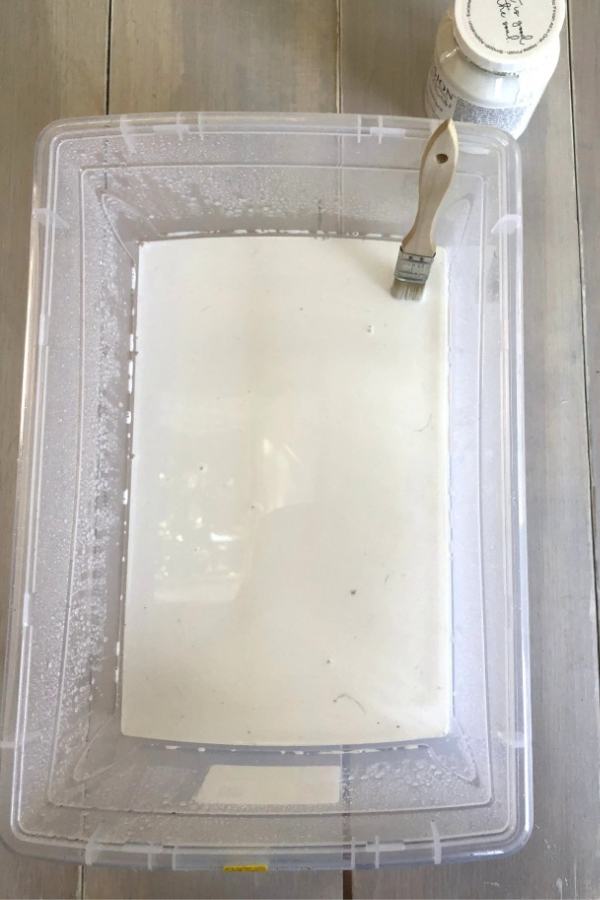
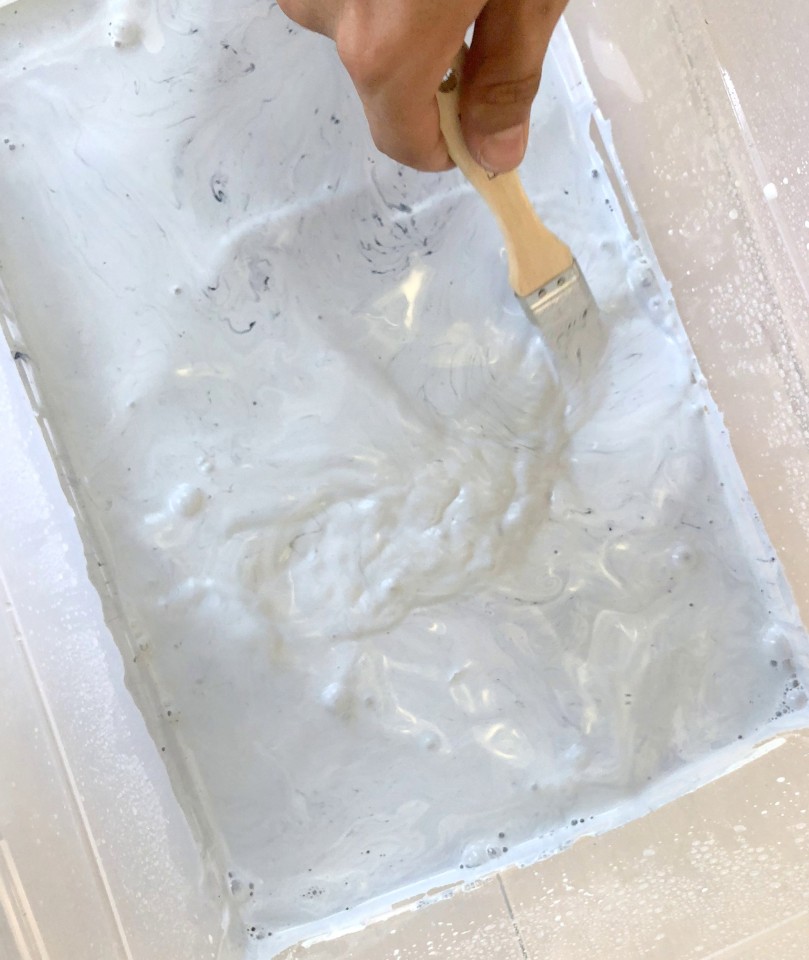
    STEP 4 – CUSTOMIZE YOUR BEADS WITH FUSION

    Time to paint your beads! Now we didn’t have time to paint hundreds of little beads so an easy solution was to dye them. And it’s super simple to do. Take your Fusion Mineral Paint and pour it into a container and add a little bit of water. Then, dip your bead strings into the mixture. That’s it! They will dye easily and look fabulous.

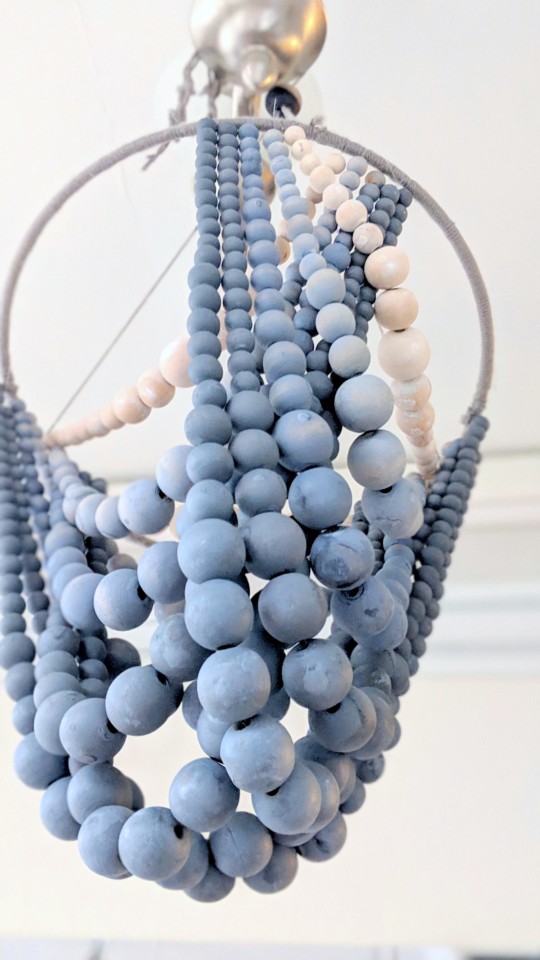
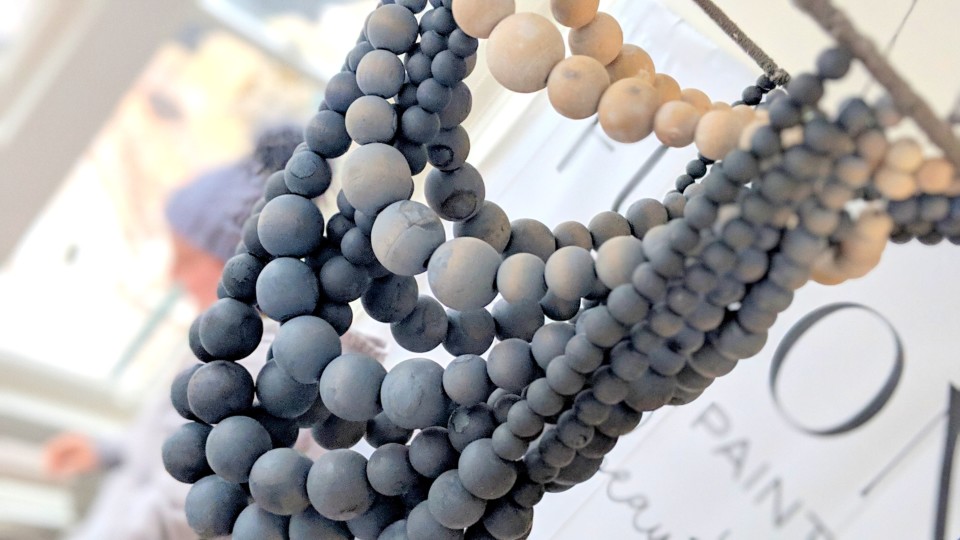
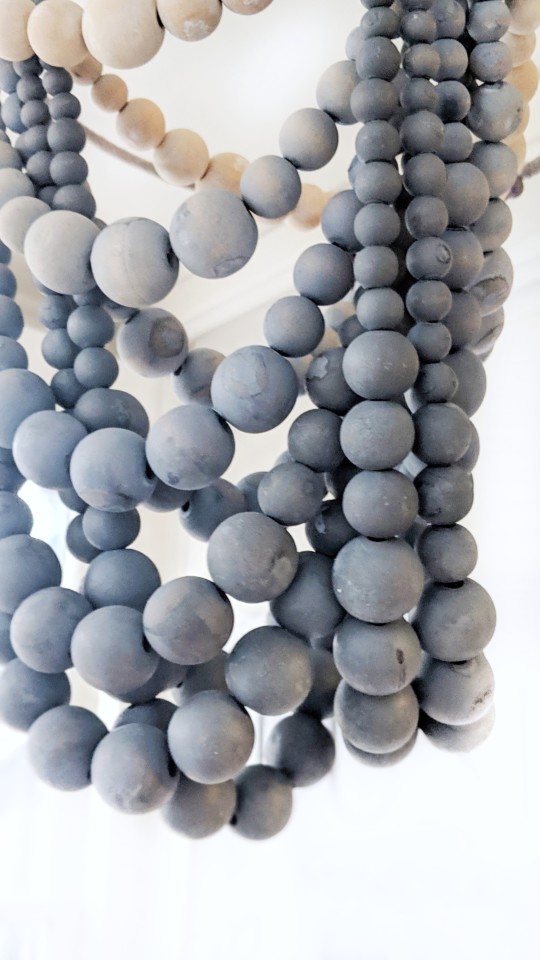
    We went for an ombre effect with these. Going from light blue to dark blue for each joined strand.

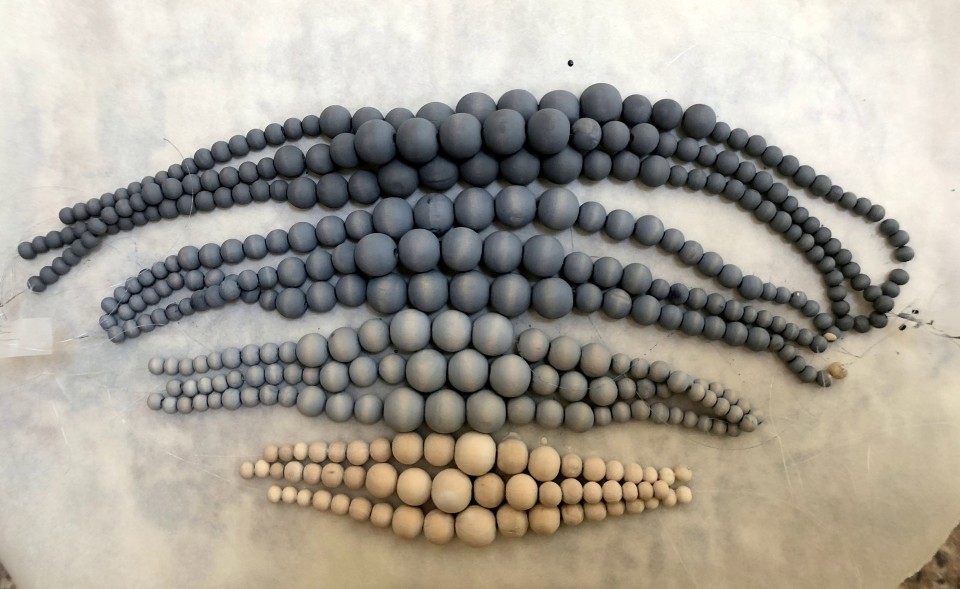
    In the end we wound up making 4 different color strands, 3 lines of beads per each color.

    STEP 5 – ATTACH BEADED STRANDS TO HOOP

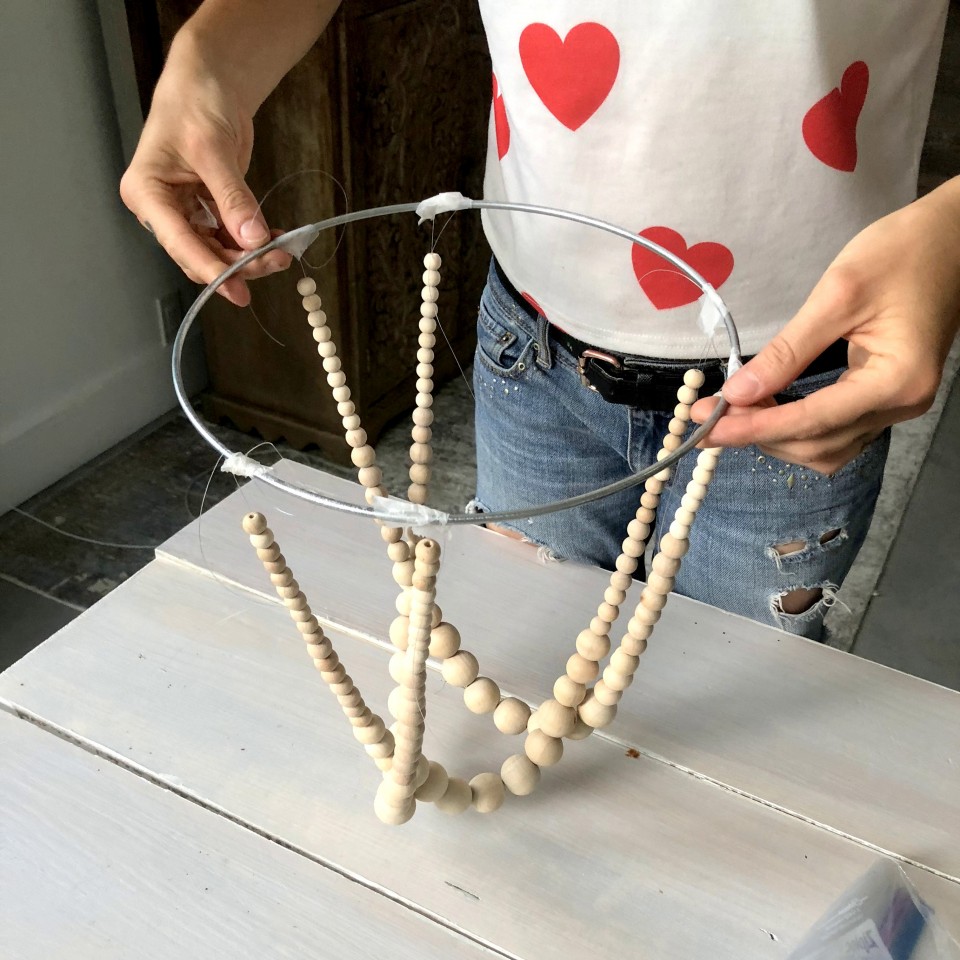
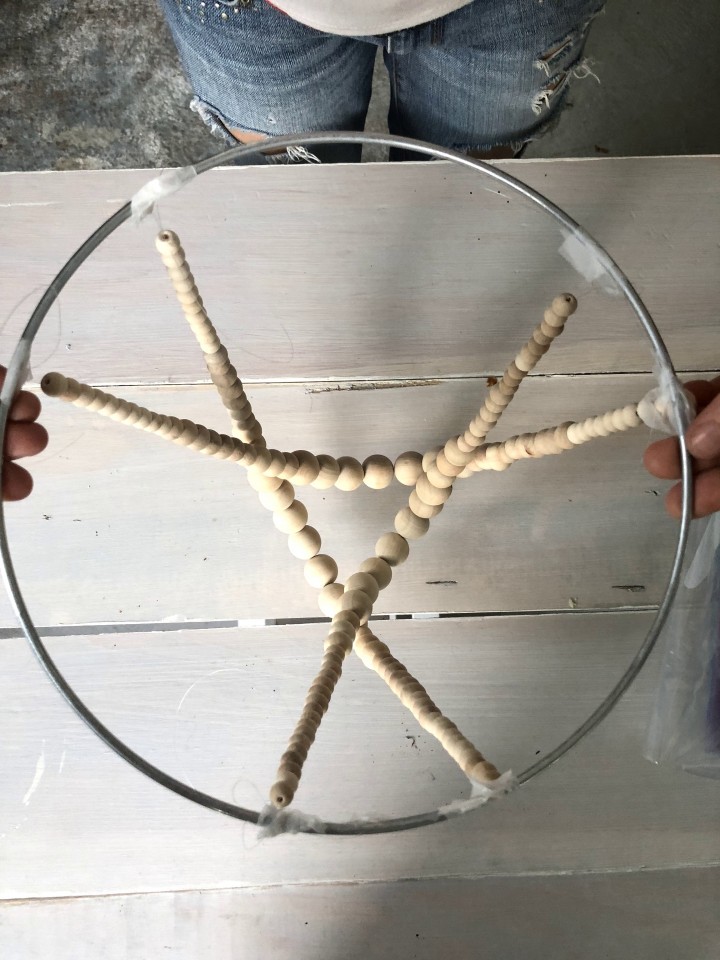
    Now you’re ready to tie the strands onto your hoop. A simple trick is to look at the top of your hoop and imagine a triangle. Then tie the beads from one end of the triangle to the other, overlapping as you tie the strands. Start with your longest bead strands first and then work your way up to the shortest.

    We took this photo during the making process before we dyed the beads, just to give you an idea of that triangle pattern. An extra set of hands is super helpful since it can be tricky to do this solo.

    STEP 6 – SHOW OFF YOUR PIECE #PAINTITBEAUTIFUL 

    You’re done! Hang your gorgeous new beaded chandelier wherever you’d like and enjoy!

    This tutorial is also featured on CoralTV where you can watch our very own Jennylyn Pringle make it in person!

    Previous Post
    -
    Next Post

    2 Responses

    1. Pingback: Paint Dyed Napkins • Fusion™ Mineral Paint
    2. Pingback: Wooden Bead DIY Projects
    • Instagram
    • Facebook
    • Youtube
    • TikTok
    • Pinterest

    fusion

    • Our story
    • BECOME AN AFFILIATE
    • BECOME A RETAILER
    • Retailer access

    customer service

    • Where to buy - Fusion Paint
    • Where to buy - Milk Paint
    • Shipping and Returns
    • Contact Us

    information

    • FAQ
    • paint safety & disclaimer
    • privacy policy

    © 2024 FUSION MINERAL PAINT.